Battery switch on travel trailer function is crucial for managing your RV’s power. Understanding how your battery switch works is key to preventing electrical problems and ensuring a smooth camping experience. This guide will walk you through the different types of switches, how to use them safely, troubleshoot common issues, and perform essential maintenance. We’ll cover everything from basic operation to advanced troubleshooting, empowering you to become your own RV electrical expert.
We’ll explore various battery switch configurations, detailing their advantages and disadvantages to help you choose the best setup for your needs. We’ll also delve into the relationship between the battery switch and your trailer’s various systems, like lighting, water pumps, and appliances, ensuring you understand how everything works together. Safety is paramount, so we’ll cover essential safety precautions and procedures to keep you safe while working with your RV’s electrical system.
Understanding Battery Switch Functionality in Travel Trailers
Your travel trailer’s battery switch is a crucial component, controlling the flow of power from your batteries to the trailer’s electrical system. Understanding its function is essential for safe and efficient RVing. This section will break down the different types, wiring, operation, and advantages/disadvantages of common battery switch configurations.
Types of Battery Switches
Travel trailers typically utilize one of three main types of battery switches: single, dual, and three-way switches. A single switch simply connects or disconnects the battery from the trailer’s electrical system. A dual switch allows you to select either your house battery or your starting battery (often found in tow vehicles), and a three-way switch offers the ability to connect both batteries together, or individually, or to disconnect both completely.
The choice depends on your power needs and setup.
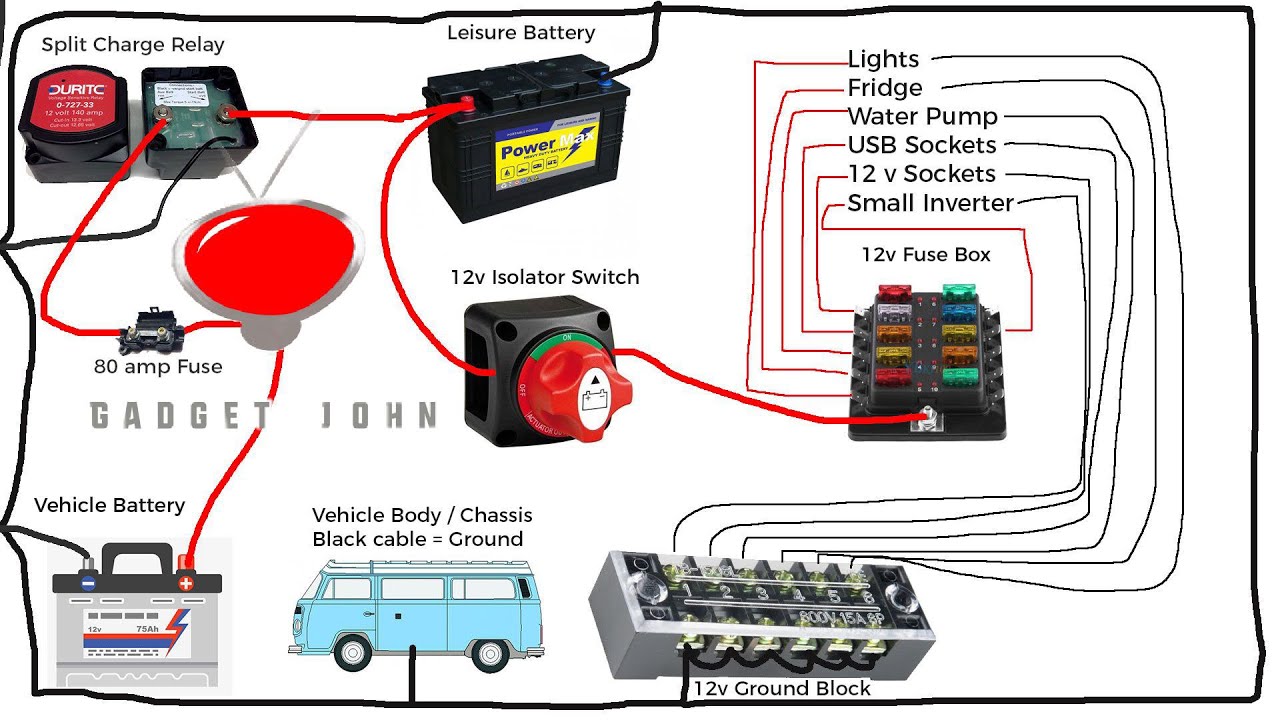
Typical Wiring Diagrams for Battery Switch Systems
A single battery switch system involves a simple connection between the battery’s positive terminal, the switch, and the trailer’s positive bus bar. The negative terminal is usually connected directly to the chassis, providing the ground. Dual and three-way switches involve more complex wiring, often using multiple terminals on the switch to manage power flow from each battery source.
A typical dual switch diagram would show separate connections for each battery’s positive terminal, leading to individual terminals on the switch, which then route power to the trailer’s positive bus bar based on the switch position. A three-way switch adds a third connection to allow for parallel connection of both batteries. Accurate diagrams are essential for troubleshooting and should be consulted during installation or maintenance.
Operating a Battery Switch: A Step-by-Step Guide
Before operating any battery switch, always ensure the switch is properly installed and all connections are secure. For a single switch, simply turn the switch to the “ON” position to connect the battery to the trailer’s system, and to the “OFF” position to disconnect. Dual and three-way switches will have clearly marked positions indicating which battery or combination of batteries are connected.
Always double-check the position of the switch before using any electrical appliances in your trailer to prevent accidental discharge or damage. Consult your specific switch’s instructions for details.
Advantages and Disadvantages of Different Battery Switch Configurations
| Switch Type | Advantages | Disadvantages |
|---|---|---|
| Single | Simple, inexpensive | Limited control, can’t isolate batteries |
| Dual | Allows separate control of house and starting batteries, prevents accidental draining of starting battery | Slightly more complex wiring |
| Three-Way | Maximum flexibility, allows for combining batteries for increased capacity or individual battery usage | Most complex wiring, more expensive |
The best configuration depends on your needs. A single switch is sufficient for simple setups, while dual and three-way switches offer increased control and flexibility for more complex systems with multiple batteries.
Troubleshooting Common Battery Switch Issues
Your travel trailer’s battery switch is a critical component, controlling the flow of power to your house batteries and potentially your chassis battery. Problems with this switch can leave you without lights, appliances, or even the ability to start your tow vehicle. Understanding how to troubleshoot these issues can save you time, frustration, and potentially a costly repair bill.
Common Battery Switch Problems and Their Causes
Several issues can arise with your battery switch, ranging from simple fixes to more complex electrical problems. Identifying the root cause is crucial for effective troubleshooting. Let’s examine some of the most common problems and their potential causes.
| Problem | Possible Causes | Solutions |
|---|---|---|
| No power to house batteries | Switch in the OFF position; blown fuse in the battery switch circuit; faulty switch; corroded battery terminals or connections; dead house batteries | Check switch position; inspect and replace blown fuses; test the switch for continuity; clean and tighten battery terminals and connections; test house batteries for charge. |
| No power to chassis battery (if applicable) | Switch in the OFF position (if combined switch); blown fuse in the chassis battery circuit; faulty switch; corroded battery terminals or connections; dead chassis battery | Check switch position; inspect and replace blown fuses; test the switch for continuity; clean and tighten battery terminals and connections; test chassis battery for charge. |
| Intermittent power | Loose connections at the switch or battery terminals; corroded connections; failing switch; loose wiring | Tighten all connections; clean corroded connections; replace the switch; inspect and repair any loose wiring. |
| Blown fuses repeatedly | Short circuit in the wiring; overloaded circuit; faulty appliance drawing excessive current | Inspect wiring for damage or shorts; check the amperage draw of appliances; replace faulty appliances. |
Troubleshooting Steps for a Non-Functional Battery Switch
Before you begin troubleshooting, always remember safety first! Disconnect the negative (-) terminal from your batteries before working on any electrical components. This will prevent accidental shocks and short circuits.Here’s a step-by-step approach:
First, visually inspect the switch itself. Look for any obvious signs of damage, such as burns, cracks, or loose connections. Check the surrounding wiring for any fraying or damage. Then, carefully check all fuses associated with the battery switch. Replace any blown fuses with fuses of the correct amperage.
Next, using a multimeter, check for continuity across the switch. This verifies that the switch itself is functioning correctly. If the switch tests faulty, it will need to be replaced. If the switch tests good, inspect the wiring and connections leading to and from the switch. Look for corrosion or loose connections.
Clean or tighten as needed. Finally, check the voltage at the battery terminals and at the output of the switch to verify that power is flowing correctly.
Safety Precautions When Working with RV Electrical Systems
Working with RV electrical systems requires caution. Always disconnect the negative battery terminal before working on any components. Use insulated tools to avoid electrical shocks. Never work on electrical systems while wet or in damp conditions. If you’re unsure about any aspect of the repair, consult a qualified RV technician.
Troubleshooting Flowchart
Imagine a flowchart with these steps:
1. Start
Is there power to the RV?
Okay, so you’re wondering about your travel trailer’s battery? First things first, understand the basic function of that battery switch. Check out this helpful guide on the battery switch on travel trailer function to get a solid grasp of the basics. Then, for some user reviews and troubleshooting tips, head over to this page for more insights on the battery switch on travel trailer function – it’s super useful for avoiding common problems.
Knowing how this works will save you headaches down the road!
2. No
Check the main breaker. Is it tripped? Reset if tripped. Still no power? Go to step 6.
Yes, power to RV? Proceed to step
3. 3. Yes
Is the battery switch in the correct position (ON)?
4. No
Turn the switch to the correct position (ON). Is there power now? Yes, problem solved. No, go to step
5. 5. Yes
Check fuses related to the battery switch. Replace any blown fuses. Is there power now? Yes, problem solved. No, go to step
6. 6. No
Check the battery switch for continuity with a multimeter. Is it good? Yes, check wiring and connections for corrosion or looseness. No, replace the switch.
Battery Switch and its Impact on Various Travel Trailer Systems: Battery Switch On Travel Trailer Function

Your travel trailer’s battery switch is the central control for your 12-volt DC power system. Understanding how it affects different systems is crucial for safe and efficient operation. A simple flip of the switch can determine whether your appliances work, your batteries charge, and your lights shine.
House Appliance Operation and the Battery Switch
The battery switch directly controls the power flow to most of your 12-volt DC appliances. These include items like your water pump, interior lights (if not connected to a separate 12V circuit), and possibly a furnace fan. When the switch is in the “off” position, these appliances are completely de-energized, preventing accidental drain on your house batteries. Switching to the “house” or “both” position connects the house batteries to these appliances, enabling their operation.
Okay, so you’re wondering about that battery switch in your travel trailer? It’s pretty crucial! Basically, it lets you disconnect your house batteries from the trailer’s electrical system, preventing drain when you’re not using it. Check out this great resource on the battery switch on travel trailer function for a deeper dive into how it works.
Understanding this is key to keeping your batteries healthy. For reviews and user experiences, you can also check out this page on battery switch on travel trailer function – it’s super helpful to see what other RVers have to say.
Keep in mind that some larger appliances (like air conditioners) usually run on 120-volt AC power and are not directly affected by the battery switch.
Battery Charging and the Battery Switch
The battery switch plays a critical role in how your house batteries are charged. With the switch in the “off” position, your house batteries are completely isolated from the charging source (typically your tow vehicle’s alternator or a shore power converter). This prevents overcharging or backfeeding if your tow vehicle is running. In the “both” or “house” position, the charging circuit is complete, allowing the batteries to receive a charge.
This ensures your batteries are properly topped up when connected to shore power or while driving. If the switch is left in the “off” position while driving, your batteries will not charge.
Trailer Lighting System and the Battery Switch
The impact of the battery switch on your trailer’s lighting system depends on its wiring. Many trailers have a dedicated circuit for their tail lights and running lights, which are directly wired to the tow vehicle’s electrical system. These lights typically function independently of the battery switch. However, interior lights, and some exterior lights, might be connected to the house battery system and, therefore, controlled by the battery switch.
When the switch is off, these lights will not work.
System Dependency on the Battery Switch
The following table summarizes how different trailer systems are affected by the battery switch position:
| System | “Off” Position | “House” Position | “Both” Position |
|---|---|---|---|
| Interior Lights (most) | Off | On | On |
| Water Pump | Off | On | On |
| 12V Refrigerator (if applicable) | Off | On | On |
| Tail Lights/Running Lights | On (usually) | On (usually) | On (usually) |
| AC Appliances (Air Conditioner, etc.) | Unaffected | Unaffected | Unaffected |
Selecting and Installing a Battery Switch
Choosing the right battery switch for your travel trailer is crucial for managing your power sources effectively and safely. A well-chosen and properly installed switch ensures you can seamlessly switch between your trailer battery and your tow vehicle’s battery, or isolate either for maintenance or to prevent parasitic drain. This section will guide you through selecting a suitable switch and installing it in your RV.Selecting the appropriate battery switch involves considering several key factors to ensure it meets your needs and operates safely within your trailer’s electrical system.
Ignoring these factors could lead to system failure or even fire hazards.
Battery Switch Brands and Models
Several reputable brands offer battery switches suitable for travel trailers. Blue Sea Systems, Perko, and Guest are popular choices, known for their quality and reliability. Specific models vary in features and amperage ratings, so research is essential. For example, Blue Sea Systems offers a range of switches, from simple two-battery switches to more complex systems with multiple banks and remote control capabilities.
Perko switches are often favored for their robust construction, while Guest offers a balance between price and performance. The best choice depends on your specific needs and budget.
Battery Switch Specifications
Before purchasing, you must carefully consider several specifications:
- Amperage Rating: This is crucial. Choose a switch with an amperage rating significantly higher than the maximum current draw of your trailer’s electrical system. Underestimating this can lead to overheating and failure. A common rating for travel trailers is 150 amps, but larger trailers might require 200 amps or more. Check your trailer’s electrical system’s specifications to determine the appropriate rating.
- Type of Switch: Common types include manual switches (toggles or rotary), and remote switches. Manual switches are simpler and less expensive, while remote switches offer convenience, especially in larger trailers. Consider the ease of access to your battery compartment when choosing a switch type.
- Number of Batteries: Most travel trailers have two batteries (one for house systems, one for starting the trailer if it has an engine), requiring a two-battery switch. Larger trailers or those with specialized systems might need a switch capable of handling more batteries.
- Mounting Style: Ensure the switch’s mounting style (panel mount, surface mount) is compatible with your trailer’s installation location. Consider whether you need a weatherproof enclosure if installing outdoors.
Installing a New Battery Switch
Installing a battery switch requires basic electrical knowledge and careful attention to safety. Improper installation can lead to electrical shorts, fire hazards, and damage to your trailer’s electrical system. If you’re not comfortable with electrical work, it’s best to seek professional help.
- Disconnect the Batteries: Before beginning any work, disconnect both positive and negative terminals of both batteries to prevent accidental shocks or shorts.
- Prepare the Wiring: Use appropriately sized wiring (AWG) that matches the amperage rating of the switch. Strip the ends of the wires, ensuring a clean and secure connection. Use appropriate wire connectors and crimp them securely.
- Mount the Switch: Securely mount the switch in a convenient and accessible location, ensuring it’s protected from the elements if installed outdoors.
- Connect the Wiring: Carefully connect the wires to the switch terminals, following the manufacturer’s wiring diagram. Double-check all connections before proceeding.
- Reconnect the Batteries: Reconnect the battery terminals. Test the switch to ensure it functions correctly, switching between battery banks as expected.
Tools and Materials Required
Proper tools and materials are essential for a safe and successful installation. Using inadequate tools can result in damage to your equipment and potentially dangerous situations.
- Battery switch (with appropriate amperage rating)
- Appropriate gauge wire
- Wire connectors (crimp-on type recommended)
- Crimping tool
- Wire strippers
- Screwdrivers (Phillips and flathead)
- Wrench (for battery terminals)
- Voltmeter (to test connections)
- Safety glasses
- Work gloves
Safety Considerations Related to Battery Switches
Working with your RV’s electrical system, especially the battery switch, requires caution. Improper handling can lead to serious injury from electrical shock, burns, or even explosions from battery gases. Understanding the inherent risks and taking appropriate precautions is crucial for a safe RVing experience.
Potential Hazards of Incorrect Battery Switch Operation
Incorrect operation of the battery switch can lead to several dangerous situations. For instance, accidentally leaving the switch in the “on” position while performing maintenance can result in unexpected electrical shocks. Conversely, leaving it in the “off” position when you need power for essential systems like the refrigerator or water pump can create inconvenience and potentially damage sensitive electronics.
Furthermore, improper switching can lead to short circuits, causing sparks, fires, and damage to the electrical system. Always double-check the switch’s position before and after any work.
Importance of Safety Equipment When Working with RV Electrical Systems, Battery switch on travel trailer function
Working with any electrical system demands appropriate safety gear. This includes wearing insulated gloves rated for the voltage levels involved in your RV’s system (typically 12V). Safety glasses should protect your eyes from sparks or flying debris. It’s also wise to use a non-conductive tool, such as a plastic screwdriver, to avoid accidental contact with live wires. Finally, ensure the work area is well-ventilated to prevent the buildup of potentially explosive hydrogen gas released by the batteries.
Risks of Working with a Live Battery Switch
Working on or near a live battery switch presents significant dangers. Direct contact with the switch’s terminals or exposed wires while the system is energized can deliver a potentially lethal electrical shock. The current, even at 12V, can be strong enough to cause muscle contractions, burns, and serious internal damage. Furthermore, the risk of accidental short circuits is heightened when working with live components, leading to fires or explosions.
Always disconnect the battery system completely before any maintenance or repairs.
Proper Disconnection of the Battery System Before Maintenance
To safely disconnect your RV’s battery system, first, locate the main battery disconnect switch. This is usually a large, clearly labeled switch near the batteries themselves. Visually inspect the switch to ensure it’s in the “off” position. If unsure, use a non-conductive tool to verify. Next, locate the negative (-) battery cable connected to the battery.
Using a wrench or appropriately sized socket and insulated gloves, carefully loosen and remove the negative cable clamp from the battery terminal. It’s crucial to disconnect the negative terminal first to prevent accidental short circuits. After disconnecting the negative cable, visually inspect the area for any signs of sparking or loose connections. The battery system is now safely disconnected.
Remember to reconnect the negative cable first when restoring power.
Mastering your travel trailer’s battery switch is a significant step towards confident RV ownership. By understanding its function, troubleshooting common problems, and performing regular maintenance, you’ll ensure reliable power for all your adventures. Remember, safety should always be your top priority when working with electrical systems. With the knowledge gained from this guide, you’re well-equipped to handle most battery switch situations, keeping your RV running smoothly and your camping trips enjoyable.
Answers to Common Questions
What happens if I accidentally leave my battery switch on the “off” position?
You’ll lose power to your house batteries and all connected appliances and systems. Your trailer’s lights, water pump, and other 12V devices won’t work.
How often should I clean my battery switch terminals?
At least once a year, or more frequently if you notice corrosion or poor connections. Clean them with a wire brush and baking soda solution.
Can I use any type of battery switch in my travel trailer?
No, you need a switch with the correct amperage rating for your system. Check your trailer’s specifications or consult a professional.
What size fuses should I use with my battery switch?
The correct fuse size depends on your battery switch’s amperage rating. Consult your switch’s documentation or an electrician for the correct size.
